Saturday, April 30, 2016

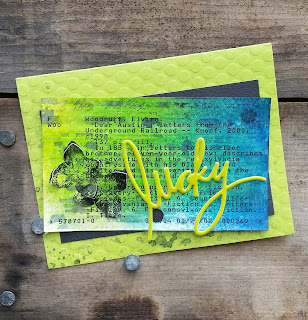
Lucky

Here's this bright beauty:


Supplies (briefly):
  • Library card base
  • Dylusions in London Blue and Fresh Lime
  • Distress Ink in Chipped Sapphire used as a monoprint over Tim's Stripes stencil
  • Flower stamps inked with MementoLuxe in Tuxedo Black then cut the edges for dimension
  • "Lucky" sticker from Heidi Swapp
  • Black paper from stash
  • Card base inked with Black Soot Distress Ink
I'd like to share this at the following challenges:
Another large tag...

After I created a new filing system for my stash of cards, I had scraps of chipboard that were about 8.5x5" and I began making larger tags like I've seen Dyan and Tim market under Ranger. Here's my latest:


Supplies and notes:
  • Scrap chipboard painted loosely with Liquitex gesso
  • Once dry, sprayed tag with a pink Glimmer Mist and Dylusions in Lemon Zest, then par-dried with a heat tool and blew at the remaining pools through my trusty McDonald's straw
  • The white sheet with triangles was a scrap from a play-time months ago.  It had a monoprinted orange Heidi Swapp stencil, then some Teresa Collins modeling paste through the Swapp stencil again with Ranger Princess Gold EP on it and heated.  For this project, I just had to trim the sheet a tiny bit, then I added some Distress Ink in Spun Sugar to the edges, and then distressed them
  • The flowers attached were made prior to this tag with the latest addition to my die collection: Tattered Flowers.  These were made using an old Nancy Drew mystery (was missing pages and discarded from the library).  The pages were sprayed with Dylusions sprays and also wicked up some dark color from my spray tray.  The beads in place of the stamen were from my stash.
  • The oak leaf is another of Tim's Alterations dies.  This particular leaf is from a white oak, and you can tell because the leaves are lobed.  The other oak leaf on that die plate is a black oak because of the spines.  It was cut from a sheet of true birdseye maple veneer, received from a friend of Grandma Jane's... awesome stuff. 
  • Those pieces of chicken wire have been around since I waged war on the squirrels last month.  BTW, I think I won based on my flowers coming up!  Anyway, I inked the pieces with gold alcohol ink mixative and attached the pieces to the tag with Recollections brads
  • The rust ribbon was in my stash.  I cut the finished edges and added some of my fave olive and metallic yarn and attached them to the card with a cute brad from my stash-- no packaging
  • In the end, I added some stamped crackles from a Prima stamp using Color Dye in Sand and Tsukineko in Galaxy Gold
I'd like to share this at the following challenges:

Mother's Day

I made this for my mother-in-law:


Supplies and notes:
  • I used Wild Honey Distress Ink as a monoprint with a Heidi Swapp stencil during play time last week, and I cut my play-card down to size and popped up with dimensional tape
  • I used a clear stamp from my stash for the sentiment, inked in MementoLuxe in Tuxedo Black
That's it!  This was definitely CAS... cut a pre-inked scrap, popped it up, and added an easy sentiment!

I'd like to share this at:

Sunday, April 24, 2016

The mother's heart...

Yeahhhhhhhh!!!!! :-)


Tim's 12 Tags of 2016 were off my radar until this past week... here is my tag for April's remix:


See the faint crazing?  Mmmm...


This is his remix graphic:

I enjoy participating in these challenges because it really requires participants to either try new techniques or to revisit techniques for desired outcomes. I personally play with resist properties often, but have never done a mosaic in this way, building up with Glossy Accents.  Very fun, especially for people like me who like puzzles and pieces...

I'm also going to share this at Happy Little Stampers April Mixed Media: Wings... cuz... look ittt...

Supplies and notes:
  • For the mosaic portion:
    • The hearts were cut out of straight-up cardboard from the recycling bin (Happy Earth Day! For a forester, every day is Earth Day!)
    • I painted the hearts with Liquitex gesso and affixed my little cut pieces from my scrap-paper bag while I watched Mountain Monsters with the fam
    • I let them dry overnight and added Glossy Accents to the "tiles"
    • For the record, I tried grouting with some modeling paste, but, nuh-uh.  I didn't like what it did to the tiles.  I considered piping modeling paste into the spaces between like a mini-caulking gun, but... nope.  Next time. (I've thought of piping with modeling paste, and I finally did it! I'll add a link when I upload images)
    • I inked it with DI in Frayed Burlap 
  • For the background/ paint-resist portion:
    • I used a library catalog card and applied Antique Linen Distress Paint through a Brett Weldele Scribbles stencil
    • When dry, I washed it with Broken China Distress Stain 
    • After that, I inked the edges with Old Paper Distress Ink and lightly spritzed with high-quality H20
    • The wings are from an old Grungeboard pack by Tim. I painted them with Liquitex gesso and sprinkled some pearl white EP by Stampendous, and added some Antique Gold Stampendous frantage EP and affixed them.  After attached, I inked the edges of the wings with Scattered Straw 
  • Other...
    • I typed the quote with my old typewriter  and dragged it through Evergreen Bough DI, then added a light coat of Ranger Crackle Accents
    • The hemp is True Hemp with metallic thread woven through
My youngest selected the quote for this, and said we should give it to a neighbor who is pregnant.  I will take her recommendation!

Death's-head hawkmoth

Well, I had no butterfly motivation until today! Cutting it a little close...


Made this with Simon Says... Monday: Butterfly Beauty in mind.  I also recalled that Happy Little Stampers' current Mixed Media Challenge is "Wings".  Let's enter there, too, shall we?


Supplies:

  • The large tag was made with a scrap of chipboard from textbook packaging. I coated it with Liquitex gesso and dried it with a heat tool
  • I sprayed the tag with Fresh Lime and Vibrant Turquoise Dylusions, then mostly dried it... not all dry.  With the small drops left, I busted out my McDonald's straw (don't ask...) and blew them around.
  • Next I used a Dyan Reavely/ Dylusions stencil with skulls, sprayed with London Blue... this is when I thought to use the "butterfly" with the skull...  this is the point at which my project had a goal...
  • I outlined the edge of the tag with a fine sharpie, and also added the name and scientific genus
  • I made the tattered flower with Tim's/ Sizzix's dies last weekend, using an old Nancy Drew novel (it was missing pages, for you book lovers who just gasped...).  I inked it with miscellaneous sprays, plus it drew up color from my spray-tray (an old gift box)
  • The "butterfly" is actually a moth.  It is of the Acherontia genus... the group of three moths in the world with the vaguely human skull-like marking on the back.  I used a scrap tattered flower die and cut off two opposite petals.  I sprayed it with Fresh Lime and Crushed Grape... gave me these crazy colors.  Added one of Tim's skull and crossbones, coated with Adirondack alcohol ink in Mermaid, and affixed to the moth with E-3000.  I adhered some Wilton stamen for the antennae... dyed them with Mermaid also and also used E-3000 to adhere these to the back of the moth.
  • I mounted the whole moth to the middle of the flower with three layers of Ranger black foam tape... perfect for this project
  • I used various miscellaneous stamps, including Recollections, Stampington, all inked in MementoLuxe in Tuxedo Black
  • I used Pebeo Dimension Liner in Lead to add detail to the moth and to line the edges of the tag again
  • I hit a few edges of the tag with Tim's Distress Spray in Black Soot and dried it with my heat tool, then blotted it a bit

Saturday, April 23, 2016

Freshly made...

I made this for Freshly Made Sketches #233:


Here is the actual sketch:

I stretched the sketch and made it horizontal, and brought the band all the way down because of the size of the target...

Supplies:
  • Echo Park Paper Company arrow paper edhed with Color Box chalk in Creamy Brown
  • The arrows and journal tag (also edged with Creamy Brown) are from a Simple Stories die-cut pack
  • The target was cut from some Maggie Holmes/Crate Paper ephemera
  • I drew the stiched lines with a Sharpie pen
  • The corners were rounded with a Fiskars punch
This is another card for the oldest at summer camp... they practice archery.  She better be a good shot after all of these years!!!

Atlantic Hearts #156

Here's an entry for Atlantic Hearts Challenge # 156:


Here's their sketch:


I flipped the sketch on it's head, which was an accident, though I'm pleased with the way it turned out.  I make some pretty random cards... this is a nice conservative card!

Supplies:
  • The flowers were cut with Tattered Florals Sizzix dies out of DCWV paper
  • The strip in the center is inked with Stormy Sky DI, then sprayed with water to smooth out
  • The sentiment is an Inkadinkado stamp received last fall from that sweetie Autumn of Sew-Paper-Paint.  I inked it with Sand and popped it up
  • I spritzed some pink Tattered Angels Glimmer Mist onto the card base, and also scored some parallel lines for the ribbon component of the sketch

Poe said it best...

I have loved this quote since I read it-- I only came across it recently.


OMG, can you see this glorious plaster texture???

Supplies and notes:
  • Library catalog card base plastered with Teresa Collins modeling paste 
  • Invoke Arts stamp inked with MementoLuxe ink in Tuxedo Black
  • Watercolored the plastered background with Loew Cornel watercolors
  • The quote was typed with my old typewriter, and the edges were dragged through puddled Black Soot DI
  • Twine by Martha Stewart, and the edge punch was also Martha Stewart
I'll share this at:

Walkin' in a washi wonderland...

The current Jingle Belles challenge is to use washi:


It's been a weird crafting week-- we were on spring break so I assumed I'd have tons of crafting time... you know what they say about assuming...  

Anyway, I did two.  They came together so fast, and it felt good to make a couple cards to add to the xmas stash.

This was a great project for stash-busting, Thank you, Jingle Belles!

Supplies:
  • "Gift" card:
    • Sparkly red washi is by Scotch
    • Sparkly holly leaves are from some old packaging
  • "Merry Christmas" card:
    • "Merry Christmas" washi by Martha Stewart
    • Cloth holly leaves and berries from Target's line, Hand Made Modern
    • Rounded the upper corner with a Fiskars punch

Thursday, April 21, 2016

It's later than you think...

I made the bulk of this two months ago:


Supplies and notes:
  • Note: if you look at this card in a linear fashion, it shows life: smiling mother... party, party, dance, dance... death.  Sorry: I sometimes examine mortality... 2016 has been a heck of a year.
  • The library cards were initially taped together with 7 Gypsies masking tape
  • Next, the cards were dabbed with Forest Moss DI, and I accidentally dripped water on them, and so that was the catalyst for more drippin'
  • Pumice Stone Distress Spray was added to the backs of the library cards and wiped down with a napkin
  • I cut a stencil like a fortress roof (uh, hard to see, but it was a scrap of cereal-box cardboard with squares cut out at the edge).  I kept the negative spaces (squares) and scattered them over the card and used them as a mask also as I used the stencil and sprayed with Dylusions in Crushed Grape.  For the crazy spray drips I blew through a McDonald's straw.
  • All of the gold accents are Liquid Leaf in Classic Gold
  • Stamps: the Catrina stamp (my all-time fave stamp) is from Invoke Arts and the other skeleton stamps are 100 Proof Press, all stamped in MementoLuxe in Tuxedo Black.  I added some mixed-pink Stickles to the flowers on Catrina's hat
  • Flowers: the purple flower is Prima (I believe) from years ago, and the orange flowers were purchased in bulk, white.  I first dabbed them with Spiced Marmalade Distress Stain, then sprayed them with Dylusions in Pure Sunshine... and it still wasn't enough, so I sprayed the backs with Dylusions in Lemon Zest
  • The cards were not cooperating to stand up, so I disassembled and reassembled using that cool yarn from Tuesday Morning and some teal washi by Scotch.
  • It's later than you think.  I've translated the quote to Spanish as it fit my project better.   I first saw this quote as a Chinese Proverb, but if you look it up, it is cited as being from Socrates, Horace, and even modern celebrities have been quoted as saying this.  Regardless, I love this quote.  Kind of morbid, and kind of a motivator.  I wrote it with a Pebeo Dimension Outline in Lead
I have a feeling I will add more to this some day, but for now I just want to share and clear up my "in progress" pile...

I'd like to share this officially at the following challenge blogs:

Shopped my stash...

... and found this swallow!


Supplies and notes:

  • This bird has been in my stash for years... close to being used a couple times, but this was the challenge to "free" it!  I love using things that are so familiar to me that they become invisible. 
  • Not sure the brand of the bird.  If I remember correctly (which is a push), it came in a clearance baggie.  It received a treatment of Tim's Crackle Paint in Picket Fence years ago.
  • I inked the bird with Chipped Sapphire DI
  • The library card base was stenciled with a Martha Stewart stencil and Dylusions spray in Fresh Lime.  BTW, this truly is a card.  I adhered two library catalog cards together at the edge, scoring the rear card to give a fold.
  • Viva Paper Pearls in Anthracite formed the eye and accent-dots. 
I plan to mail this to a friend who has a couple swallow tattoos and needs some cheering.  Meanwhile, I'll enter it into Shopping Our Stash #248: Use chipboard.

Jingle Belles: Peace on Earth-day

Okay, I can play along with this... this fortnight's challenge at Jingle Belles is to celebrate Earth Day by using and reusing items, and theirs was the challenge that inspired this.  Here's my taggy-tag:


Supplies and notes:
  • Well, I'm always using library cards... so BOOM: re-use #1
  • I plastered the library card with Teresa Collins modeling paste and texturized it using my old AARP card with cut niches... BOOM: re-use #2 (for those of you that have done the math, I married an older man... I always joke and say it was the one benefit to marrying an older man: I'm a member of AARP!)  After that was dry, I wiped it a little with Walnut Stain Distress Paint then painted it here and there with dark brown watercolors (Loew Cornel).  After that I added some Brushed Corduroy DI using an old makeup sponge from the kids' face-painting kit (re-use #2.5), the dripped some water on it... had to!
  • The Trapper-Santa came from an ornament box that had all kinds of St. Nick's on it... you know I couldn't toss that!  (Re-use #3) I painted it with Tim's Distress Crackle Paint in Clear Rock Candy
  • The twine was from some packaging... re-use #4
  • The buttons on the twine are Memory Makers.  My mom bought these for me years ago.
  • The mica at the bottom was the last thing to be added... it is from Stampendous.  It looked kind of rugged... I want this to look all old and trapper-ish.  I adhered these flakes with Elmer's Craft Bond.
I plan to share this at Jingle Belles for their "Peace on Earth-day" challenge, but also at Frilly & Funkie for their "It's not easy being green" challenge.  Further, I'll throw this out there for the Crafting By Designs challenge to "get ready for Christmas."  Whoa, whoa, whoa: I also added buttons, so I'll share at Creative Knockouts #138.

Stash box

This started out as a box to hold my die-cuts...


Supplies and notes:
  • The cute corrugated box itself was kept from a gift of Lemon Fudge made by the monks in Kentucky HERE.  (Here's a secret: I eat about 3 lbs. of fancy fruitcake every holiday season.  My folks always buy the first fruitcake of the season, she they also splurge for the extra goodies like Lemon Fudge and Bourbon Fudge... sooo goood... highly recommend).  I used the box to house the die-cuts of my new Tattered Florals by Tim (am I the last person to own these???)
  • The flowers were made with these dies.  These were made with an old Kelly Maps book from the late '80s.  I sprayed them with some sheer-pink Tattered Angels Glimmer Mist and attached them to each other with Glossy Accents.  In order to make these flowers, I've looked at several tutorials, but I think in the end we all do our own thing.  Here's the tutorial I looked at multiple times, however: What A Beautiful Mess,
  • The beads in the flowers are from a package from Monika at Creative With Monika (Thank you!). These were affixed with Glossy Accents
  • The box was pasted with Teresa Collins modeling paste then painted with Tim's Distress Paint in Weathered Wood
  • The leaves were cut from some scrap paper, but I inked it with Tim's DI in Forest Moss and then pasted with Tim's Distress Crackle Paste in Clear Rock Candy.  This didn't give me what I wanted, so I sprayed them with Tim's Distress Stain in Pumice Stone and blotted the excess ink (I always say it, but Pumice Stone is more green than Iced Spruce... take the tip if you don't own both)
  • The flowers and leaves were affixed with matte Mod Podge
I plan to share this at the following challenges:
  • Clear It Out: Theme: nature; Stash: greenery (the leaves are Tim's from Sizzix, and these had been cut and in my desk for a few weeks... I just unburied them!)
  • Frilly & Funkie: "It's not easy being green..." Recycle, upcycle, et cetera. The Kelly Maps book has been given new life, as well as the box.  Also, I used a hotel room key-card to apply the modeling paste.  For me, it IS easy being green-- I keep everything as if I were a person of the depression era! 
  • Creative Corner Challenge: Spring Flowers

Wednesday, April 20, 2016

CASology + Mod Squad

You are seeing what my mom will get for Mother's Day!:


Supplies and notes:
  • I cut the heart out of watercolor paper and then watercolored it
  • When dry, I inked it with Tim's Distress Embossing Ink and added some Custer's Last Stamp Clear EP
  • The clear EP was dirty (I knew it... it is my "dirty" clear), so I decided to heat-emboss it more with some Princess Gold Ranger Embossing Powder
  • I wrote "Mom" with my Loew Cornel watercolors
I'd like to share this at the following challenges:

Friday, April 15, 2016

You stamped with WHAT for Color Throwdown???

I made this for a friend.. how fun to receive:


When I was in 7th grade, one of my best friends went to a different junior high, and though we lived nearby and saw each other every weekend, we wrote snail-mail letters to each other and decorated the envelopes.  It was always fun to receive funky envelopes with fancy-folded letters.  Who remembers 1993???  Oh yeah!

Supplies and notes:

  • You can see the DI's I used for this envelope above...
  • That block is what I used to stamp.  It was packaging from something, and I... I... I hoarded it.  There.  I said it.  I kept a small piece of packaging.  Truth be told, I will keep it still, and and and: I have another one.  
  • I actually added some Glossy Accents to the Studio G rain boots stamp.  It is very subtle, but that is good... the post office won't freak out! 
This project was inspired by the following two challenges:

Another jar...

Here's another aged jar:


Supplies and notes:
  • Started out with another baby food jar left over from my brother and niece's visit ("Thou shalt not throw out a small jar in a crafter's home")
  • First, I coated the lid with Liquitex gesso and touched it a bit with Fired Brick and Walnut Stain Distress Paint... UPDATE: I also added DecoArt's Rich Espresso metallic paint in this stage...
  • Days later I coated the lid with Black Soot Distress crackle paint
  • The last phase on the lid was to spray it twice (drying between) with Lindy's Stamp Gang spray in Ethereal Green
  • For the jar, I dripped a few drops of Adirondack Alcohol Ink in gold, added a few squirts of the Ranger Blending Solution, and rolled it around to coat the jar
  • I am storing Studio Calico veneer birds (duh) in this jar, and I glued the Studio Calico label (which was edged with Black Soot ink) to the side with matte Mod Podge, then wrapped it with a rubber band for a few days


Here's this little lady, soaking up the sun:

This is Millie.  She is missing Buca, and she is looking old all
 of a sudden.  I put Buca's old scarf on her and I think she liked it.
She was laying on the doormat of the scrap-shack.

I'd like to share this over at SanDee & Amelie's Steampunk/Industrial Challenge for April.  I loved playing with this, and what was the greatest was experimenting over days... I am actually an impatient person (therefore I love my heat tool), but I always really love playing with pastes and paints over days and watching what happens after the passage of time!  This was one of those cool projects that was even more satisfying than instant gratification!  This project isn't anything super-exciting, but I love it.  I think it's cool, and I can't even think of anything that I could add to improve it, so it shall stay the way it is... for now.  Any ideas?


Viva + Corrosive

How cute is this?


I used the current Viva La Verve sketch:


Supplies and notes:

  • A couple library cards for the panels
  • For the rear due-date card, I just left it as-is
  • For the front library card, I pasted 'er with Teresa Collins modeling paste through a Tim/StampAnon stencil (Honeycomb)
  • After modeling paste dried, I used my Loew Cornel watercolors (as I always say, this palette is older than my kids... it always brings back good memories of college nights, drinking with one of my BFF's and painting late into the knight)
  • The horse and hearts are Colorbok dies from my momma
  • Sequins from my stash
  • I haven't decided if this will go to my friend's daughter [ironically, the BFF that I wrote about's daughter] or to a woman who helps me in the library-- she is so girlie and she loves horses, so I have yet to add a sentiment
  • Oh, also smooshed some Tattered Angels Glimmer Mist onto the actual card for a nice touch to the background
I plan to share this at the following challenges:
I haven't played with either of these challenges in a while-- I'm glad to.  I love these here parts of Blogland.